EQQ Installer
Current release: EQQSetup v26.01 Build 141
The EQQ Installer sets up Ewarenow Quick Query on a Windows Server, including the web application, the database, optional MCP Gateway for AI integration, and all supporting configuration. It runs as a single .exe wizard or unattended from a JSON file.
System Requirements
| Layer | Requirement |
|---|---|
| OS | Windows Server 2016+ or Windows 10/11 with IIS |
| Rights | Local Administrator (installer self-elevates) |
| Web server | IIS 10+ with URL Rewrite module |
| .NET | .NET Framework (bundled with the web app) |
| Database | One of: SQL Server 2008+, MySQL 5.7+, PostgreSQL 10+ - with an admin account (sa, root, or postgres) reachable during install |
| AI add-on | ASP.NET Core Hosting Bundle - required only if you enable the MCP Gateway; installer links to the download if missing |
Installation Modes
| Mode | When to use | Effect on data |
|---|---|---|
| New Installation | First-time EQQ setup on this server | Creates fresh databases and the initial admin user |
| Upgrade | Moving an existing install to a newer build | Preserves all data, users, and settings; runs schema migrations |
| Uninstall | Removing EQQ | Drops the EQQuery and EQQDemo databases the installer created; your own registered client database is not dropped, only its EQQLogin user/certificate are removed |
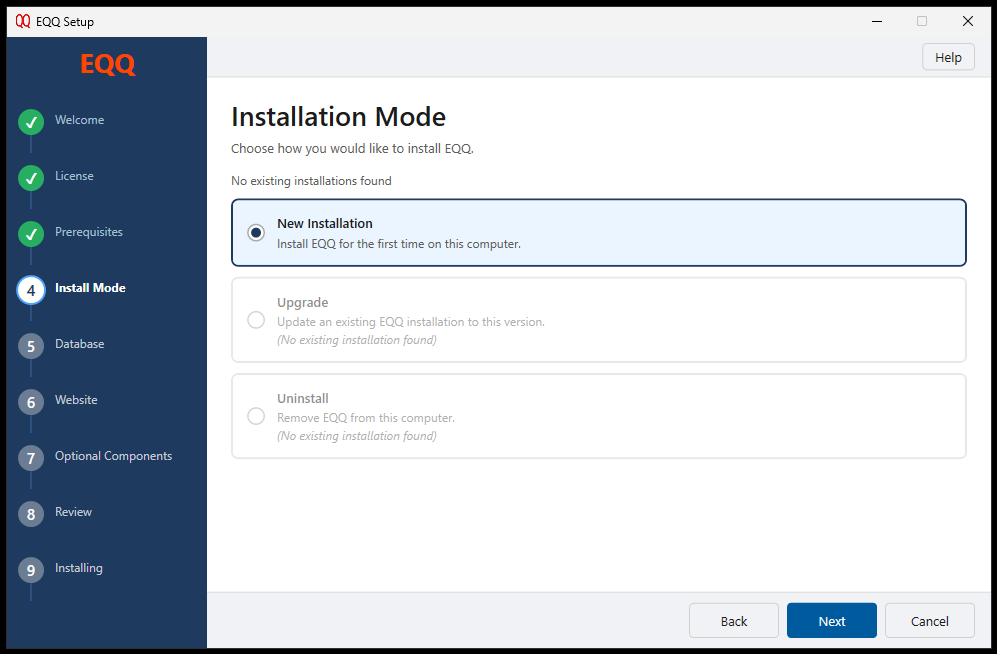
The Install Mode step reports how many existing installations it found (1 existing installation found / No existing installations found) and greys out Upgrade / Uninstall with "(No existing installation found)" when there is nothing to act on.
Interactive Install Walkthrough
The wizard has nine steps. You can go back and edit any earlier step before the final install.
1. Welcome
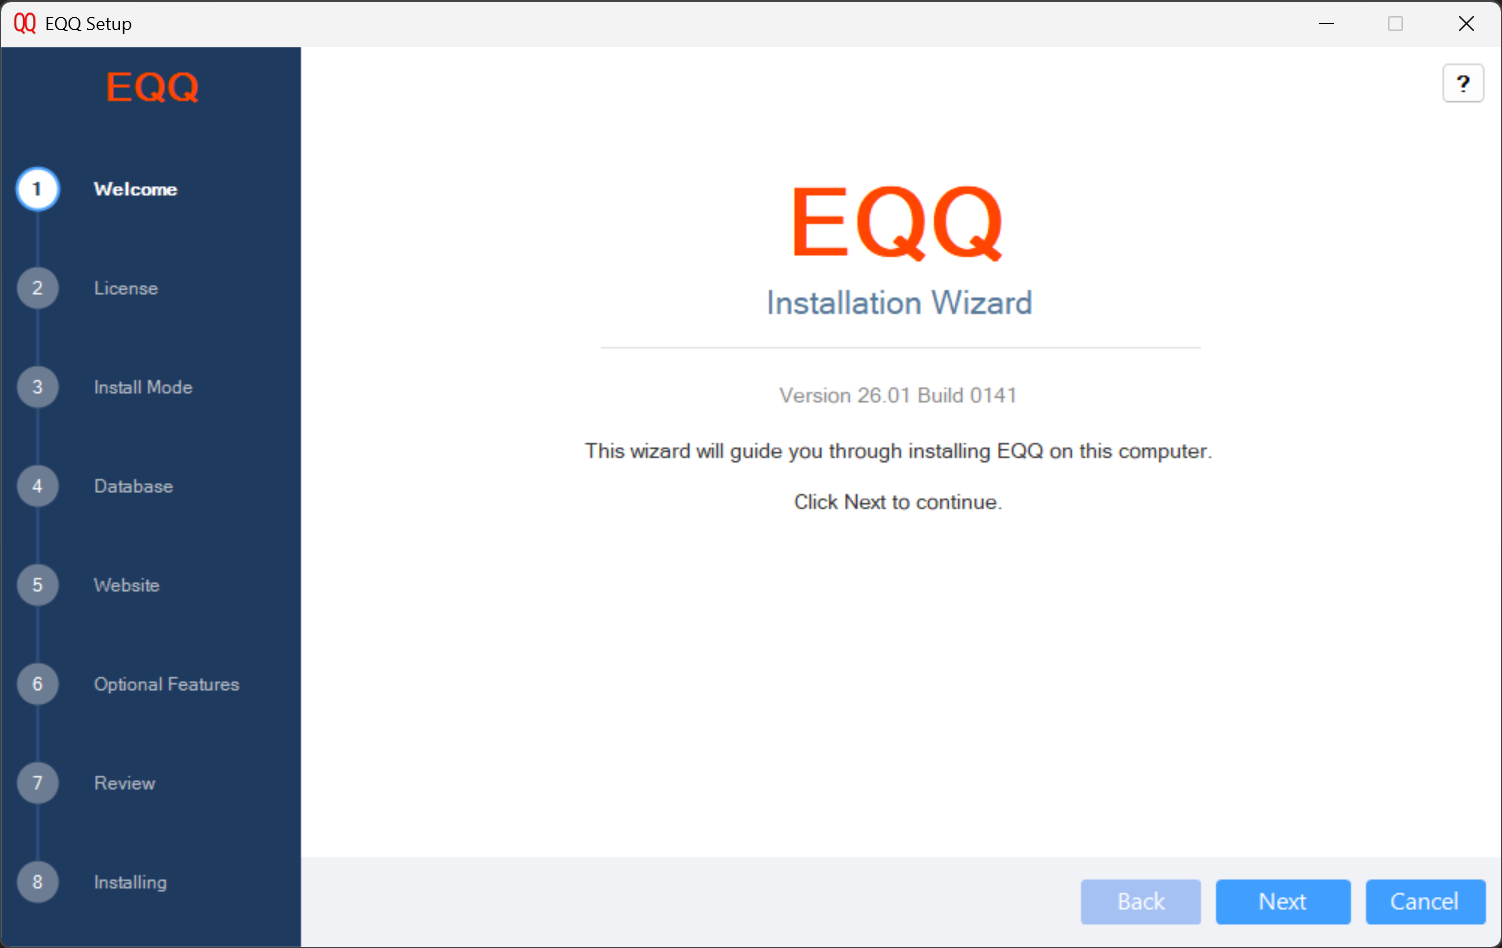
Shows product name and version (reads "Version Unknown" before install). Click Next.
2. License
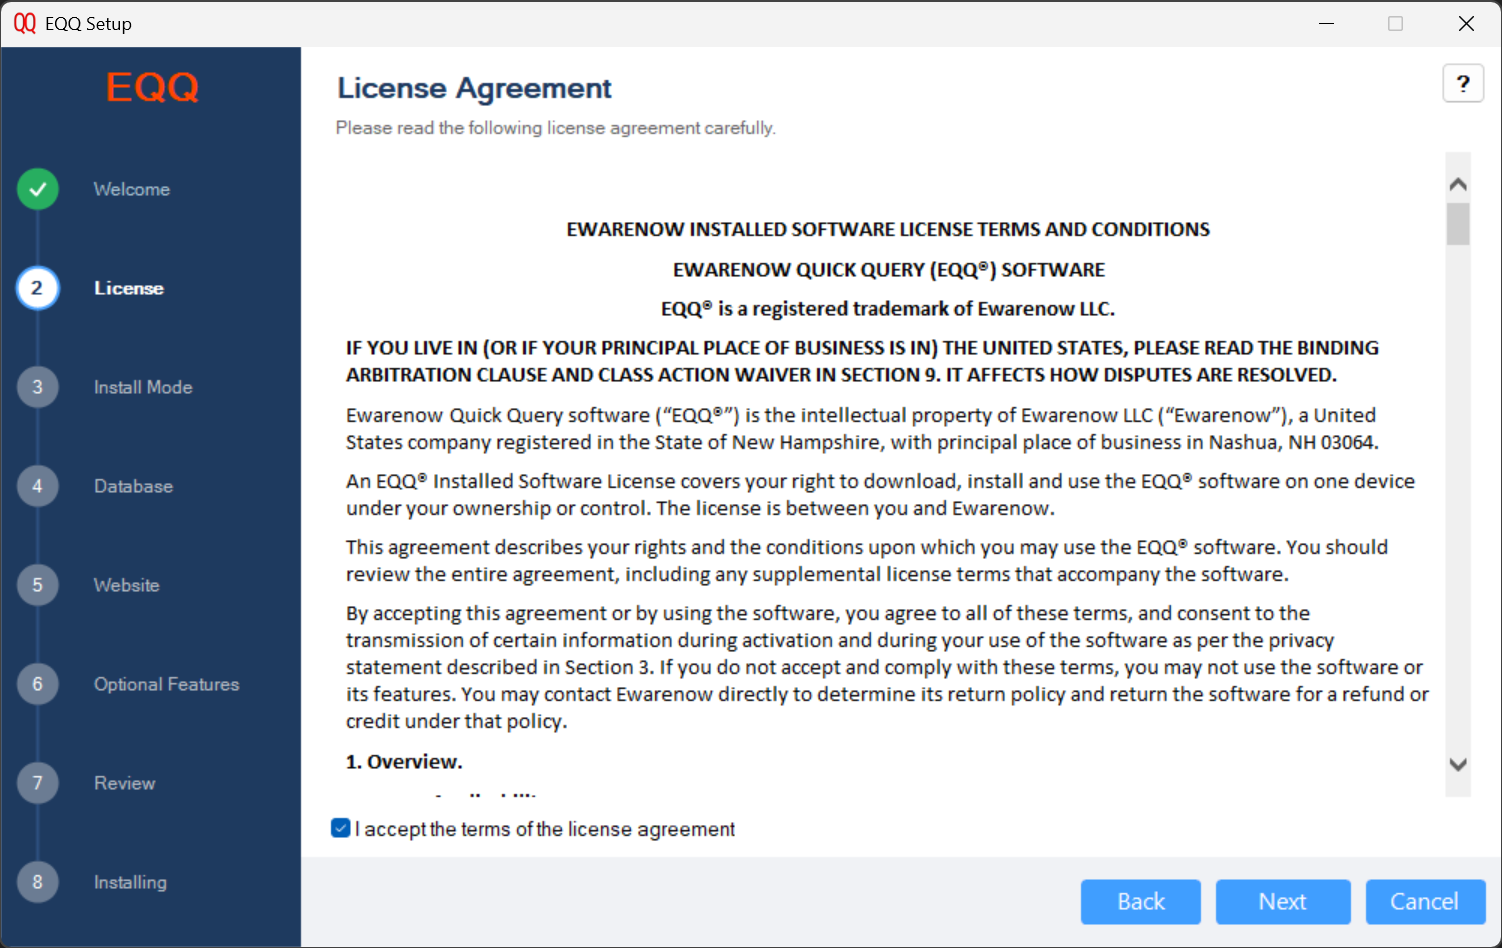
Read and accept the Ewarenow Installed Software License Terms and Conditions to continue. Next stays disabled until I accept the terms of the license agreement is checked.
3. Prerequisites
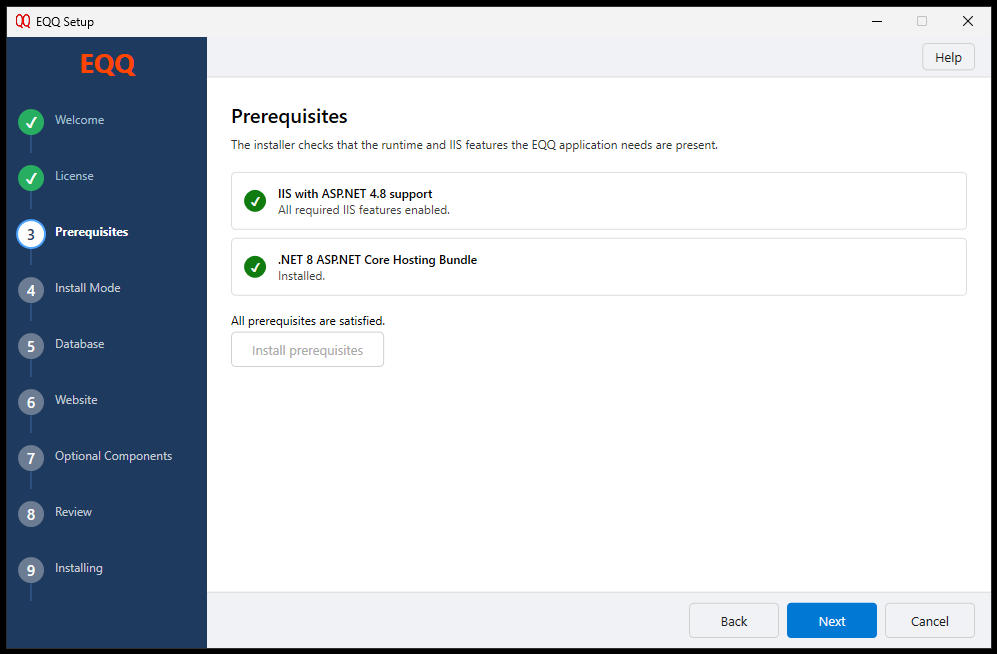
The installer checks that the runtime and IIS features EQQ needs are present:
- IIS with ASP.NET 4.8 support
- .NET 8 ASP.NET Core Hosting Bundle
If either is missing, its row shows a warning instead of a green check and Install prerequisites becomes clickable to fetch and install the missing piece. When both are satisfied the page reads "All prerequisites are satisfied" and the button is disabled.
4. Install Mode
Pick one:
- New Installation - Install EQQ for the first time on this computer.
- Upgrade - Update an existing EQQ installation to this version.
- Uninstall - Remove EQQ from this computer.
Fresh install (no existing installation detected):
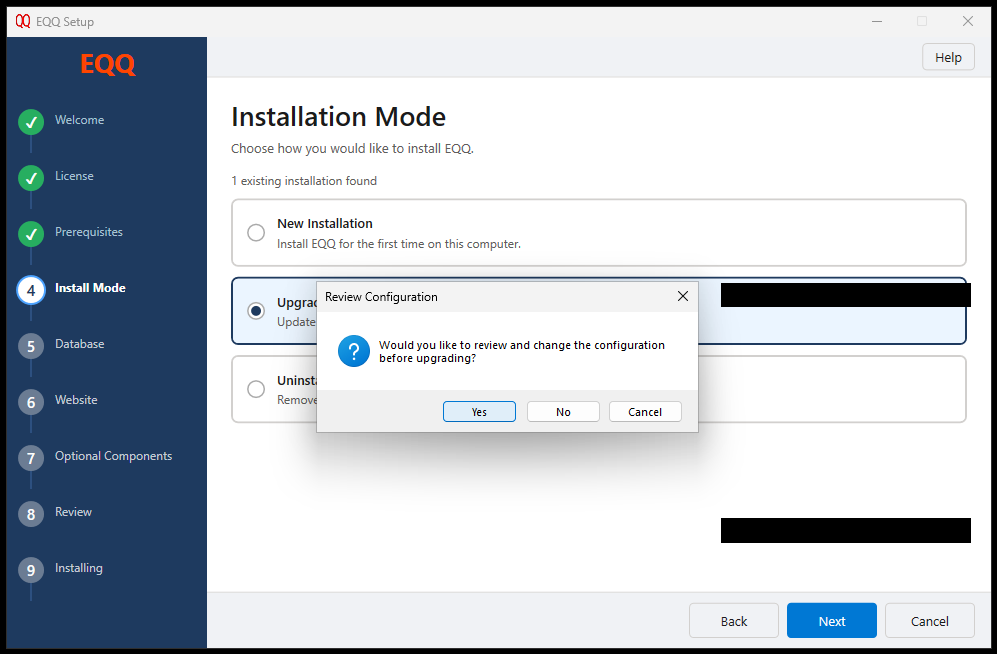
Upgrade (existing installation detected; selecting Upgrade prompts a Review Configuration dialog - "Would you like to review and change the configuration before upgrading?" - Yes walks through every step with the existing values pre-filled, No jumps straight to Review):
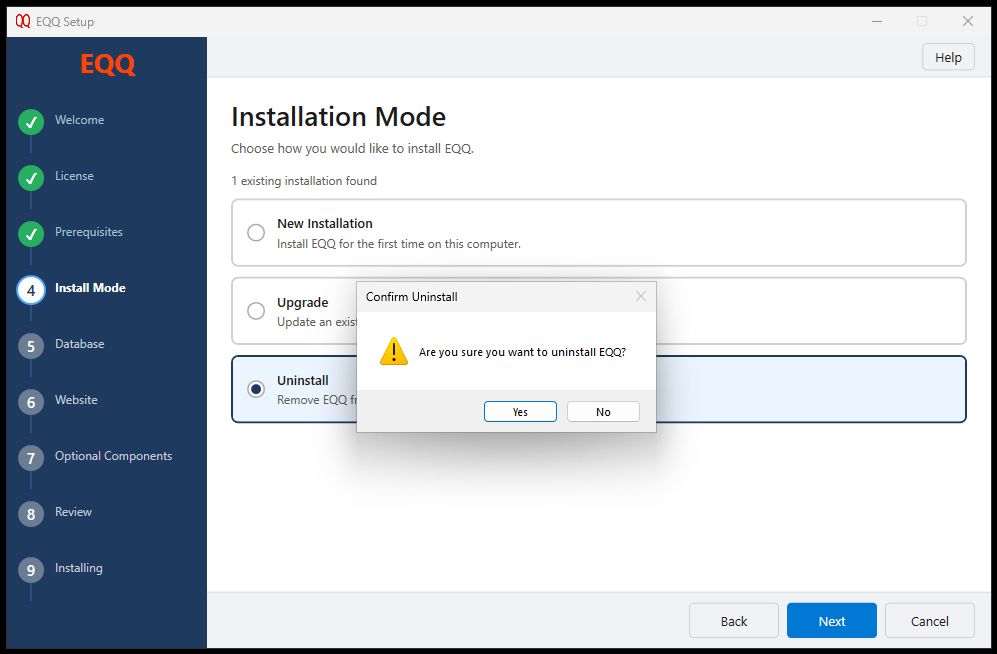
Uninstall (selecting Uninstall and clicking Next shows a Confirm Uninstall dialog: "Are you sure you want to uninstall EQQ?"):
5. Database Configuration
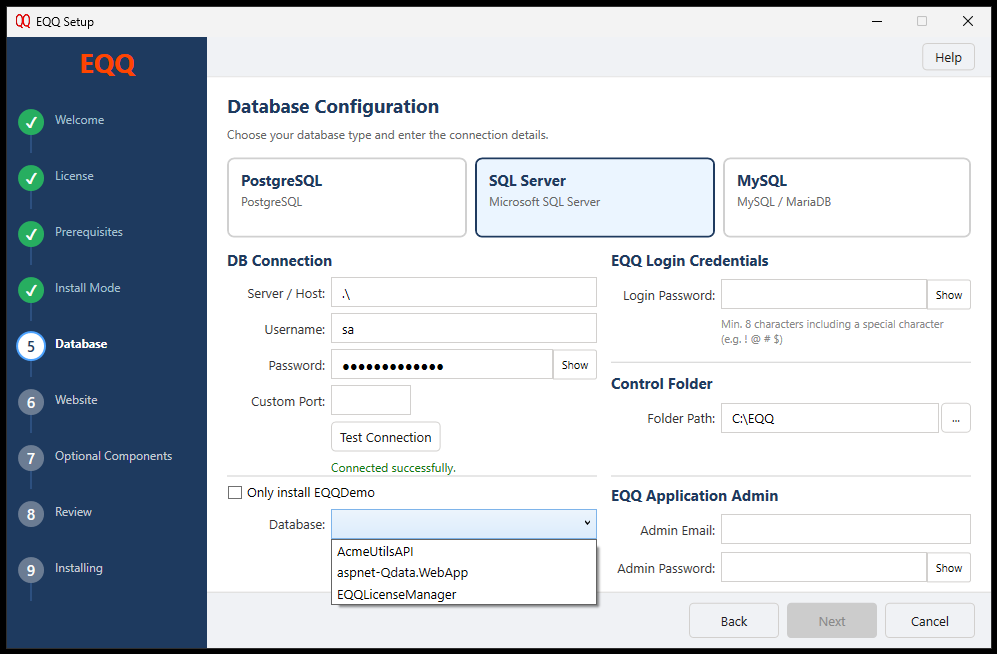
Pick your database platform (PostgreSQL / SQL Server / MySQL) and fill in:
DB Connection:
| Field | Example | Notes |
|---|---|---|
| Server / Host | .\, .\MSSQLSERVER, localhost |
|
| Username | sa, root, postgres |
Must have rights to create databases/logins. |
| Password | - | Used only during install - not stored. |
| Custom Port | (blank = platform default) |
Click Test Connection - the form shows "Connected successfully" once it reaches the server. On success, Database becomes a dropdown of the databases found on that server (for example AcmeUtilsAPI, aspnet-Qdata.WebApp, EQQLicenseManager) - pick the one EQQ should read/write against, or check Only install EQQDemo to skip registering a client database.
EQQ Login Credentials:
| Field | Notes |
|---|---|
| Login Password | Password for the dedicated EQQLogin SQL account the web app uses at runtime. Minimum 8 characters including a special character (! @ # $). |
Control Folder:
| Field | Default | Notes |
|---|---|---|
| Folder Path | C:\EQQ |
Where EQQ stores certificates and control data. |
EQQ Application Admin (Optional):
| Field | Notes |
|---|---|
| Admin Email | First EQQ admin user - leave blank on an upgrade to keep the existing admin. |
| Admin Password | First EQQ admin password. |
6. Website Configuration
Configures IIS hosting for the web application - Site Name, App Pool, Physical Path, Port, Hostname, and the IIS Bindings list (Add/Edit/Remove). Not captured as a standalone screenshot this pass, but the values it produces are visible read-only in the Review step below (Site Name EQQ_App, Port 8081, Path C:\EQQ\EQQ_App).
7. Optional Components
Lets you enable the MCP Gateway for this install. The installer profile records this as MCP Gateway: Yes/No plus an MCP Port value (5000 by default) - see What Gets Installed below for what that setting actually controls at runtime. Not captured as a standalone screenshot this pass; see the MCP Gateway page for post-install setup.
8. Review
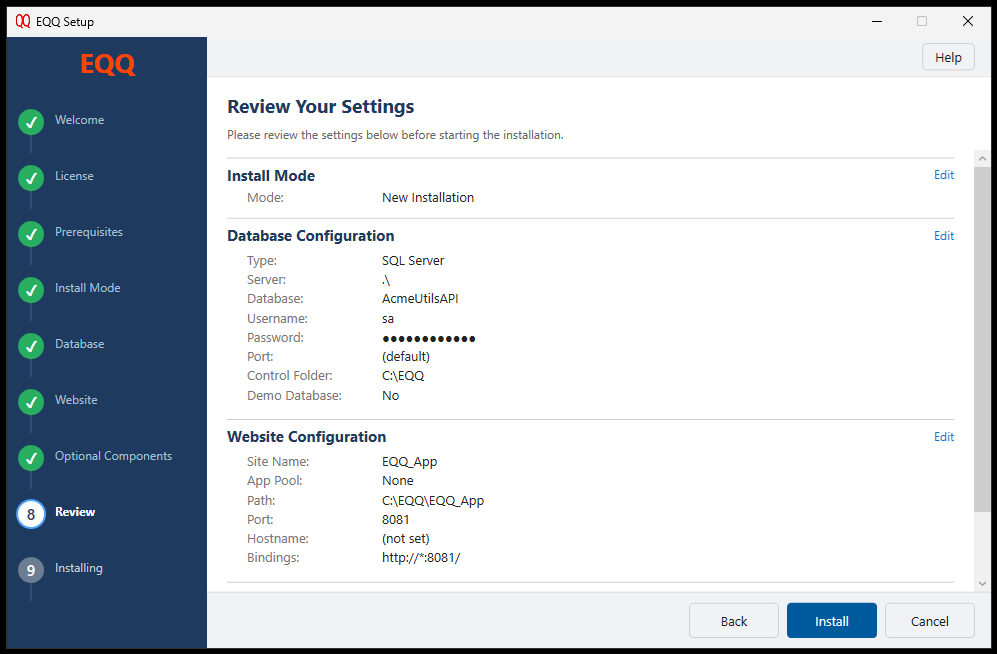
Read-only summary of every selection you made, grouped by section (Install Mode, Database Configuration, Website Configuration, and more below the fold) with an Edit link per section to jump back and adjust it. Click Install to begin.
9. Installing
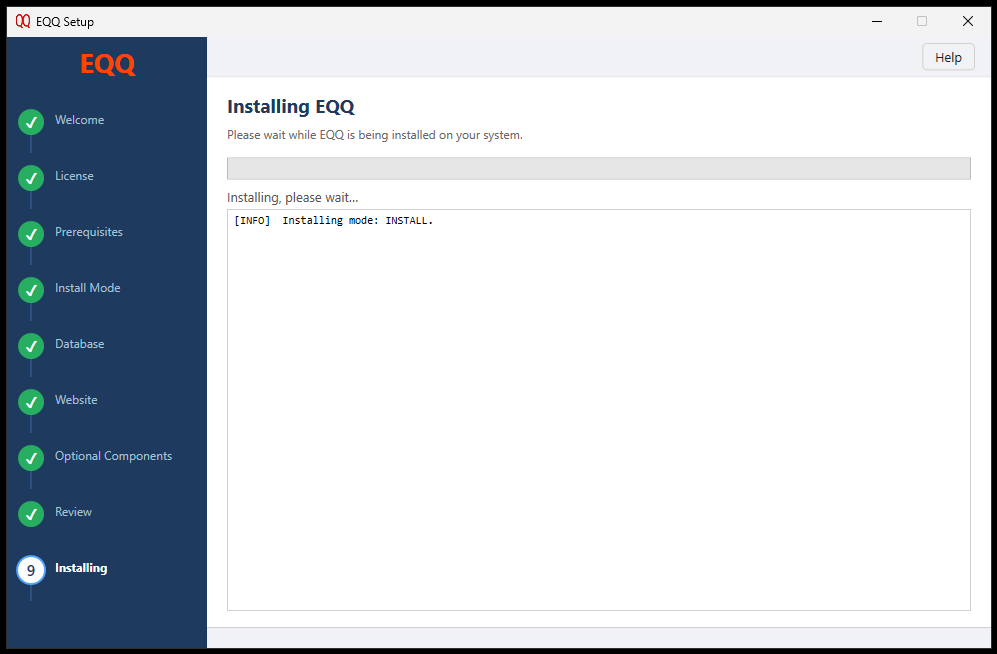
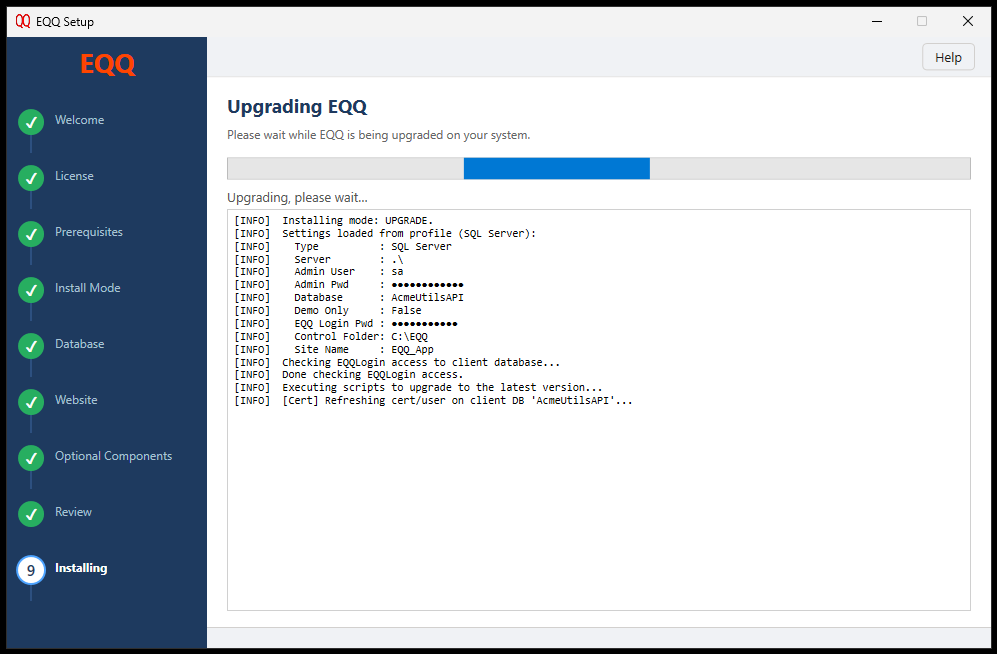
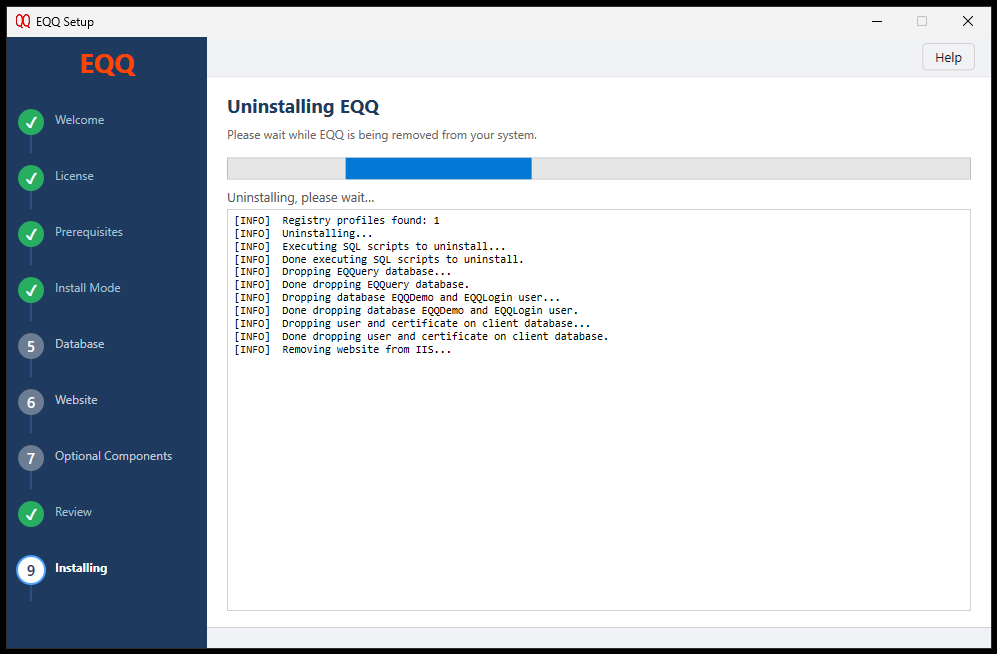
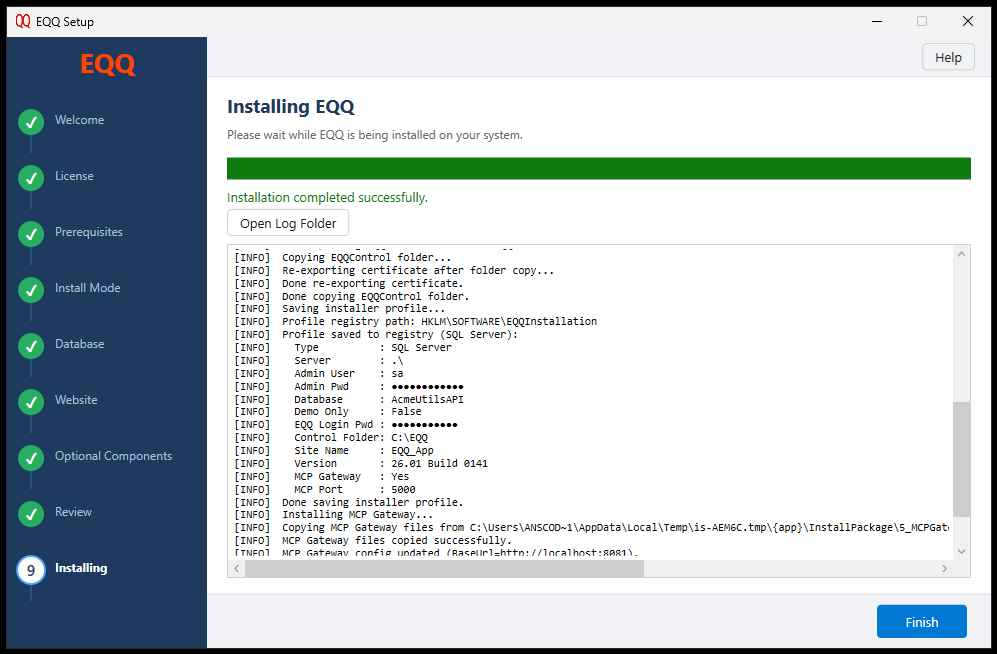
Progress bar plus a real-time log showing each action the installer takes. The page title changes based on the mode picked in step 4:
New Installation - title reads "Installing EQQ":
Upgrade - title reads "Upgrading EQQ":
Uninstall - title reads "Uninstalling EQQ":
When finished, the progress bar turns green, the page reads "Installation completed successfully.", an Open Log Folder button appears, and Finish becomes clickable:
Sign in with the admin email and password you entered in Step 5.
Video Walkthroughs
Full screen-capture recordings of real installer runs on a clean test VM, one per mode - each is the actual wizard end to end, not a staged demo. Sensitive fields (login/admin passwords, admin email) are blacked out.
Fresh Install - New Installation from a machine with no prior EQQ install:
Upgrade - running the same installer over an existing install, choosing Upgrade:
Uninstall - removing an existing install:
What Gets Installed
Folder layout
C:\EQQ\
├── EQQ_App\ ← IIS web application files
├── EQQ_Control\ ← Certificates, saved SQL, control data
├── EQQ_InstallerLog\ ← Installer logs (timestamped)
├── MCPGateway\ ← MCP Gateway sub-application files (only if enabled)
│ ├── web.config
│ └── logs\
└── Backup\ ← Optional database backups
Paths are configurable during install - the table above shows the defaults.
IIS
| Artifact | Default name | Path |
|---|---|---|
| Web site | EQQ_App |
C:\EQQ\EQQ_App |
| App pool | Auto-created, matches site name | (No Managed Code is fine for MCP sub-app; .NET for the main app) |
| MCP Gateway | (only when enabled) | Copied from the installer's own package temp folder into the control folder during install |
A real install log with MCP Gateway enabled shows:
[INFO]   MCP Gateway   : Yes
[INFO]   MCP Port      : 5000
[INFO] Installing MCP Gateway...
[INFO] Copying MCP Gateway files from C:\Users\<user>\AppData\Local\Temp\...\InstallPackage\5_MCPGateway...
[INFO] MCP Gateway files copied successfully.
[INFO] MCP Gateway config updated (BaseUrl=http://localhost:8081).
The installer profile records a distinct MCP Port (5000 by default), but the gateway's own config is then pointed at the main site's port (8081 here, matching the Website step's port) rather than listening separately on 5000 - confirmed identically across an Upgrade run and a New Installation run. Treat MCP Port as an internal installer setting rather than a port you need to open or connect to directly; see the MCP Gateway page for the actual client-facing setup.
Databases
| Database | Purpose | Created on |
|---|---|---|
EQQuery |
Main EQQ catalog (users, queries, views, settings) | New installs |
EQQDemo |
Sample data for demos and first-run tutorials | New installs (optional) |
| Your client DB | Your actual reporting/analytical data | Optional - register under Settings → Database later |
Database login
A dedicated application login is created (EQQLogin) with the password you supply in Step 5. The web application uses this login; the admin credentials (sa, root, postgres) are used only during install and are not stored.
Unattended (Silent) Installation
For imaging, repeat deployments, or CI pipelines.
Command line
Exit codes:
| Code | Meaning |
|---|---|
0 |
Success |
1 |
Failure - see the log in C:\EQQ\EQQ_InstallerLog\ |
Config file
Sample config.json for a new SQL Server install with MCP enabled:
{
 "Mode": "install",
 "DbType": "mssql",
 "SqlServer": ".\\SQLEXPRESS",
 "SqlAdminUser": "sa",
 "SqlAdminPassword": "YourAdminPwd",
 "EqqLoginPassword": "EqqAppPwd",
 "EqqAdminEmail": "admin@example.com",
 "EqqAdminPassword": "FirstAdminPwd",
 "EqqControlFolder": "C:\\EQQ",
 "IncludeDemoDb": true,
 "UseStandardBackup": true,

 "SiteName": "EQQ_App",
 "AppPoolName": "None",
 "WebRootFolder": "C:\\EQQ\\EQQ_App",
 "Bindings": [
 { "BindingType": "http", "IpAddress": "*", "Port": 8081, "HostName": "" }
 ],

 "InstallMcpGateway": true
}
Common options
| Option | Values | Default | Notes |
|---|---|---|---|
Mode |
install / upgrade / uninstall |
install |
|
DbType |
mssql / mysql / postgresql |
mssql |
|
SqlServer / MySqlServer / PostgreServer |
hostname | platform default | |
...Port |
int | 1433 / 3306 / 5432 | |
...AdminUser |
string | sa / root / postgres |
Install-time only. |
...AdminPassword |
string | - | Install-time only. |
EqqLoginPassword |
string | admin password | Persistent app login. |
EqqAdminEmail / EqqAdminPassword |
string | - | Required for new installs only. |
EqqControlFolder |
path | C:\EQQ |
Root for control data. |
IncludeDemoDb |
bool | true |
Install the demo DB. |
UseStandardBackup |
bool | true |
Restore from bundled backup. |
SiteName |
string | EQQ_App |
IIS site name. |
AppPoolName |
string | None |
None = auto-create. |
WebRootFolder |
path | C:\EQQ\EQQ_App |
Physical path. |
Bindings |
array | HTTP 8081 on all IPs | See sample above. |
InstallMcpGateway |
bool | false |
Include the AI gateway - installed as an in-process sub-application at /mcp on the same site and port, not a separate service. |
RotateMssqlCertPasswordOnUpgrade |
bool | false |
SQL Server upgrade only. |
SkipIisDeployment |
bool | false |
DB-only validation. |
Upgrade Behavior
When you run a newer installer over an existing install and pick Upgrade:
- Version check - reads the currently installed build.
- Schema migrations - runs only the upgrade scripts newer than your current build, in order.
- Web files replaced - the
EQQ_Appfolder is updated with the new build. - Preserved - all users, roles, queries, views, functions, API keys, MFA enrollments, client databases.
- Rotate certificate (optional) - if you ticked the checkbox, the SQL signing certificate gets a new per-install password.
- Version recorded - the new build number is written back to the EQQ configuration store.
Back up first
The installer does not auto-backup databases. Take a SQL backup or snapshot before clicking Install.
Uninstall Behavior
Confirmed from a real uninstall log, in order:
- Reads the installer's registry profile to find the existing installation.
- Executes SQL scripts to uninstall.
- Drops the
EQQuerydatabase. - Drops the
EQQDemodatabase and theEQQLoginuser. - Drops the
EQQLoginuser and signing certificate on your client database - the client database itself is left in place. - Removes the website from IIS.
So unlike a typical "keep the data" uninstaller, EQQuery and EQQDemo (the databases the installer created) are dropped. Only your own registered client database survives - and even then only its EQQLogin user/certificate are removed, not the database.
The installer also does not remove:
C:\EQQ\EQQ_Control\(certificates, custom SQL)C:\EQQ\Backup\- IIS configuration that pre-existed the install
Back up before uninstalling
If you need the data in EQQuery or EQQDemo afterward, back them up before running Uninstall - the installer drops them as a normal part of the uninstall flow, not as an opt-in.
Post-Install Checks
Once the installer finishes, verify:
- Sign in - open
http://<server>:<port>/and sign in withEQQAdminand the password you set in the installer. - Change your password if you want to update it after first sign-in.
- Enable MFA on the admin account - see Account & Security.
- Settings → License Manager - activate your license.
- Settings → Database - register any client databases you plan to query.
- MCP Gateway (if installed) - create an API key (My Account → API Keys) and test from Claude Desktop - see the MCP Gateway page.
Troubleshooting
| Symptom | Resolution |
|---|---|
| Installer won't launch | Right-click → Run as administrator. UAC elevation is required. |
| "SQL Server connection failed" in Step 5 | Check instance name, firewall, TCP/IP enabled in SQL Server Configuration Manager. |
| "Port 8081 already in use" | Change the site port in Step 6, or stop the conflicting service. |
| MCP Gateway option greyed out / fails | Install the ASP.NET Core Hosting Bundle from the Microsoft download link shown, then run iisreset and restart the installer. |
| Upgrade finishes but site won't load | Recycle the app pool, then hard-reload the browser. Check App_Data/Logs/error.log. |
| Headless install returns exit 1 | Look in C:\EQQ\EQQ_InstallerLog\ - the most recent file has the failing step. |
| Admin credentials forgotten after install | Have a Security Administrator reset the EQQAdmin account, or restore from a known-good backup. |
Log location
All installer runs write a timestamped log to:
Send this file with any support request - it contains every step the installer took.